Let's get this started.
Wait a minute. "If I am going to reinstall my OS, how am I going to read this post?", you asked. Get another PC! :D This post isn't going to be of much help if you can't read it while installing. If you don't have another PC to view this post, the best thing you can do is ask someone to print you a copy and have it beside you while installing.
OK, now that the question is out of the way, let's proceed.
Access BIOS Setup
The first thing to do is make some changes to the computer’s CMOS. Think of CMOS as a small storage area where the system keeps track of certain hardware parameters. These include the amount of memory available, the size of the hard disk, etc. This is done through the BIOS setup utility. When the computer starts, we will see it “counting” the amount of memory available. While the computer is “counting”, press DEL to enter BIOS setup. Some computers use other keys such as F2 or F10.
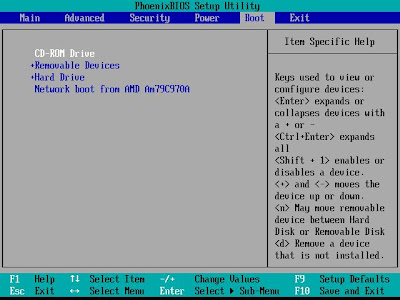
Here is the initial screen of the BIOS setup utility. Other computers differ in user interface, but contents are similar.

In the above screenshot, we see the menu bar in the upper portion which contains the menus Main, Advanced, Security, Power, Boot, and Exit. The large area in the middle contains information for the currently selected menu. The lower portion displays keyboard shortcuts for the available commands.
Boot From CD
Select the Boot menu. This menu displays the computer’s boot order.

The above screenshot tells us that the computer will first look for boot files from Removable Devices, such as floppy disks and USB flash drives. Boot files are system files that are needed to start Windows. If it cannot find the boot files, it will try searching for it from the next device specified in boot order.
We are going to boot from our Windows XP installation CD, so we are going to move CD-ROM Drive as the first device in the boot order by selecting it and pressing + until it reached the top.
Insert the Windows installation disc in the CD-ROM drive. Remove/detach any diskettes or USB storages devices. Save changes and exit setup by pressing F10. The computer should now restart and eventually proceed to the installation procedure. Some systems will display a message telling the user to press any key to boot from CD. You should press any key when you see that message; otherwise the system will not boot from CD and will instead boot from the next device in the boot order.

When booting from the Windows installation CD, the Setup program will load from files as part of its initialization process.

When the initialization completes, the setup program provides different options on what to do next. Since we are going to install Windows XP, we simply press ENTER to continue.
On the next screen, the Windows XP Licensing Agreement is displayed, you must agree to it by pressing F8; otherwise you won’t be able to continue with the installation.
Hard Drive Partitioning

The setup program will ask what partition should Windows be installed. The above screenshot tells us that I have a 40 GB hard disk where all spaces are unpartitioned. We have some options here. We can simply press ENTER to proceed with the installation. The setup program will automatically use the whole space and create a single partition. But, using a single partition is a not good idea. We should divide our hard drive to at least two partitions. The first partition will be the space where Windows will be installed. The second partition will contain our personal files or any other data. This setup provides an advantage when we later on decide to reinstall Windows. If we are using a single partition, we can’t just reformat and reinstall Windows because our personal files will be completely wiped out. With using two partitions, our data partition remains intact and we are free to format the first partition and proceed with the installation.
To create our first partition, we press C.

How large should our system partition be? That really depends on the programs that you are planning to install. In the above screenshot, I used 10 GB (10240 MB, 1 GB = 1024 MB) for the size of my system partition. This is more than enough for Windows XP, a room for MS Office installation and other software/games.
We will create another partition from the unpartitioned space for our data partition and use up the maximum size possible. Partitions are automatically assigned a drive letter.

Do not worry about the remaining unpartitioned space. It is being used to maintain information about the partitions.
We will now select the first partition that we had created as the place to install Windows. Format the partition using the NTFS filesystem to take advantage of the security features of Windows XP. After formatting, the setup program will start copying some files.

During installation, the setup will restart your computer. Since the first boot device is the CD-Drive, the system will ask you to press any key to boot from the CD-ROM. Do NOT do this. Doing so will cause you to repeat the whole installation process. Do not press any key. This will allow the system to skip the CD-ROM and proceed to look for boot files on the remaining devices in the boot order. Since we had removed/detached other removable storage devices such as diskettes and USB flash drives, the computer will boot from hard drive.
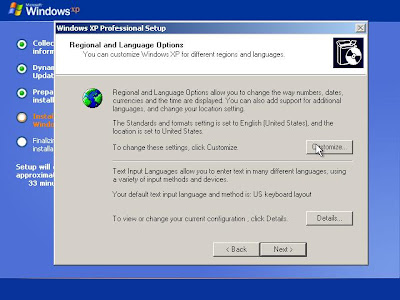
In the installation process, you will also be asked to select Regional and Language options.

Feel free to customize your settings and set your default text input language and method.

Additional windows will popup to receive inputs from you. Proceed with software personalization by entering your name and organization. Key-in your unique product key. Provide a name for your computer and set the administrator password. Bear in mind that the name you had provided for your computer cannot be used later as account name. Set correct date and time, and select your time zone. After you had entered this information, the setup program will continue installing other devices.
If the setup process asks you to enter networking settings, select “Typical settings”. It is a good choice most of the time. If you want to customize your settings like setting your own IP address, select “Custom settings”.

If you were asked to select a domain or workgroup, you might need to ask your network administrator about setting this. If you don’t know what to enter, you can just leave the default settings as is and proceed with the installation.
Setup will continue with installation. When asked about protecting your PC, select “Help protect my PC by turning on Automatic Updates now” and continue. Select how will your computer connect to the Internet, or you can also skip this process. You may need to obtain information for your network settings from your network administrator. Indicate whether you want to register with Microsoft or not.

Enter account IDs of the people who will use this computer. The accounts that will be put in here will be of computer administrator-type.
My practice is to create a single computer administrator account and create limited accounts later. Windows requires at least 1 administrator account aside from the built-in “Administrator” account. I name my administrator account root with the concatenated year, month, day, and the 24-hour time as shown in the screenshot. Why root? Well, other than Windows operating systems, I do play around with Linux also, and root is the Linux account that has all the privileges – a super user. If you are not comfortable with it, you can choose your own name for your first account such as Administrator200711151512.
That was the final step of the installation process. You are now ready to use your operating system.
When your computer restarts, log-in using your administrator (root) account. To be able to use your second partition, we need to format it. Open "My Computer". Right-click on the drive letter assigned for that partition, select "Format...". In the window that pops-up, enter your desired volume label. Use NTFS as file system to take advantage of Windows XP's security features. Click OK and wait for formatting to complete.
Congratulations! You may now call yourself a Windows Installation Guru - Level 1 ;-P
Links
Recommended Microsoft Windows books from Amazon.com

5 comments:
Nice guide! The addition of datetime stamp to the admin username is brilliant. The screenshots helps a lot too. To add, I dont connect the computer to the network while doing an installation. I attach it after I secured it with an offline installer of antivirus and/or firewall software.
@cyril: that's a good idea. I'll be updating this guide to reflect that one. On the the next articles that I am planning to add, I am going to reveal the reason why I added datetime stamp to admin accounts. :-)
Great Post! Keep 'em coming mer. There's more where that came from right? :)
@owen: lol, my day job's been keeping me pretty busy lately, so the posts had to be put on hold. thanks for dropping by dude. :-)
Post a Comment